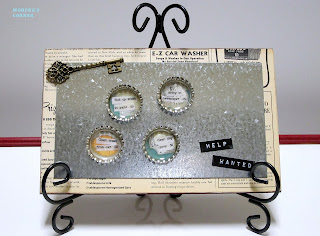
I know I know...kinda cheesy - but I had to!
Today we are giving you one item, two options!
4x6 or 8x10 - perfect.
Throw them in a cute frame,
create a cute pedestal sign,
create a chore chart,
make a message board,
do anything!
I'm dyin' over this stuff... After making my pretty cute (ya..I'm bias) bottlecap magnets, I kind of "need" a new magnet board.. Thinking of covering it in favorite, framing it and LOVING it!
This is part two of my tutorial explaining the chore chart system I have started using. Last time I showed you how easy it was to make the bottle cap tokens. This time I am explaining how to make the "help wanted" chart.
This project is quick and easy and can be adapted for lots of uses:
1. Paint a rectangle of wood (I buy a bag of craft wood at the craft store).
2. Cut a piece of cardstock to fit the wood and adhere it with modge podge.
3. When it dries, sand and ink the edges of the paper.
4. Use E6000 to glue a sheet of metal to the board (available at Mindy May's Market).
5. Embellish as desired.
6. Display on an easel (also purchased from Mindy Mae!)
This would also be a fun way to display pictures or little notes. It could be glued to one of the fun frames available at Mindy Mae's:
Or glued on to one of the awesome candlesticks from Mindy Mae's to make a unique photo display:
Have fun creating! I hope you'll check back later for part three of my tutorial!


These would be so great for school...the possibilities for center activities is endless.
ReplyDelete